In The Kitchen With Tobo: Real Mexican Tacos: Some time ago, we visited (for the first time) Real Mexican Taco place which had been recommended to us. We had never eaten real Mexican tac...

Showing posts with label kitchen. Show all posts
Showing posts with label kitchen. Show all posts
Tuesday, October 24, 2017
In The Kitchen With Tobo: Real Mexican Tacos
About our first ever real Mexican tacos and the diner.
In The Kitchen With Tobo: Real Mexican Tacos: Some time ago, we visited (for the first time) Real Mexican Taco place which had been recommended to us. We had never eaten real Mexican tac...
In The Kitchen With Tobo: Real Mexican Tacos: Some time ago, we visited (for the first time) Real Mexican Taco place which had been recommended to us. We had never eaten real Mexican tac...
Thursday, September 15, 2016
In The Kitchen With Tobo: 12 Months 12 Cakes: Blueberry Cake
In The Kitchen With Tobo: 12 Months 12 Cakes: Blueberry Cake: The blueberry cake, which I made in August, was light and tasty. I used canned fruit instead of fresh ones, but the result was still grea...
Tuesday, March 29, 2016
In The Kitchen With Tobo: Our Easter Keepers / Wielkanocne przepisy do zacho...
Check out our new post: In The Kitchen With Tobo: Our Easter Keepers / Wielkanocne przepisy do zacho...: These recipes are our Favorite ones, considering holiday cooking. So I thought I should save them in case if they disappear from the origin...


Thursday, January 21, 2016
Simplified Banana-and-Vanilla Pudding/ Deser Waniliowo-Bananowy
Banana pudding is quite a popular kind of dessert. Here is my simplified
and lower in calories version of this treat. From time to time, we
enjoy it when we finish having our dinner. The dessert is simple but
quite tasty too!
Yield: 2
2. Chill the pudding in the fridge. Prepare to dessert bowls.
3. Get the pudding out of the fridge. Spread a Tablespoon of pudding at the bottom of the dessert bowl.
4. Place a single layer of wafers on the pudding.
5. Put banana slices on the wafers.
6. Fill the bowl with pudding, put a few wafers at the top.

Ilość porcji: 2
Smacznego!
** Jeśli chcemy, by deser był 'bogatszy', po schłodzeniu masy budyniowej mieszamy ją delikatnie z łyżką bitej śmietany. Osobiście jednak nigdy śmietany nie dodaję.
Yield: 2
Ingredients:
- 1 box instant vanilla pudding (5.1 oz / 144g), milk;
- 1 banana - sliced;
- round vanilla wafers;
- 1TBS whipped cream (optional)*.
What to do with it:
1. Prepare the pudding according to the instructions provided on the package (I always add 2 1/2 cups milk instead 3).2. Chill the pudding in the fridge. Prepare to dessert bowls.
3. Get the pudding out of the fridge. Spread a Tablespoon of pudding at the bottom of the dessert bowl.
4. Place a single layer of wafers on the pudding.
5. Put banana slices on the wafers.
6. Fill the bowl with pudding, put a few wafers at the top.
Note:
* If you wish, you can mix the pudding with some whipped cream. Do it gently, with a spoon, when you the pudding is chilled already.
Bon Appetit!

Pudding waniliowo-bananowy, który jest czymś więcej niż zwykły budyń, to
popularny w Teksasie (oraz innych stanach USA) deser. Poniżej
przedstawiam jego uproszczoną i mniej kaloryczną od tradycyjnego
przepisu wersję. Ten łatwy w przygotowaniu deser, od czasu do czasu,
jest elementem finałowym naszego domowego obiadu. Z powodzeniem może być
też serwowany jako poczęstunek dla gości.
Ilość porcji: 2
Składniki:
- 1 podwójne opakowanie budyniu waniliowego* (te, które kupuję w lokalnych sklepach spożywczych ma 144g), mleko;
- 1 banan pokrojony na plasterki;
- okrągłe biszkopty waniliowe;
- łyżka bitej śmietany (opcjonalnie)**.
Przygotowanie:
- Przygotowujemy budyń według przepisu na opakowaniu - zawsze dodaję pół szklanki mleka mniej niż jest podane w instrukcji, dzięki temu masa budyniowa jest trochę gęstsza.
- Po ostudzeniu wstawiamy budyń do lodówki. Przygotowujemy dwie miseczki deserowe (lub jedną większą).
- Kiedy budyń stężeje, wyjmujemy go z lodówki. Rozprowadzamy łyżkę budyniu na dnie miseczki deserowej.
- Układamy na tym pojedynczą warstwę biszkoptów waniliowych.
- Na biszkoptach układamy plasterki banana (też jedną warstwę tylko).
- Wypełniamy miseczkę budyniem, a na wierzchu kładziemy biszkopty waniliowe.
Uwagi
* Zazwyczaj używam budyń błyskawiczny, który bezpośrednio po wymieszaniu z mlekiem można wstawić do lodówki. Wszystko zależy od naszych upodobań i jakości budyniu, nie każdy budyń błyskawiczny jest smaczny.** Jeśli chcemy, by deser był 'bogatszy', po schłodzeniu masy budyniowej mieszamy ją delikatnie z łyżką bitej śmietany. Osobiście jednak nigdy śmietany nie dodaję.
Thursday, November 19, 2015
My Texas Alphabet: Q for Quesadillas / i co to jest
The idea for this alphabet post series comes from ' The Alphabet of
My Emigration' by Dee Dorota L., member of The Polish Ladies Abroad
Club, who has relocated to England.
I have also decided to join the project and write about My Texas Alphabet twice a week.

Quesadillas are one of the dishes on the Tex-Mex menu which I learned to make from scratch. We enjoy having them from time to time. You can read here what I wrote about it some time ago.

Quesadillas to jedno z dań kuchni Tex-Mex bardzo popularnej w Teksasie. Nauczyłam się je przyrządzać i muszę dodać, że moje quesadillas smakują nam lepiej niż te serwowane w pobliskim miejscu z jedzeniem meksykańskim. Przepis jest dosyć łatwy więc przygotowanie quesadillas nie sprawia mi dużego kłopotu. Podaję do nich ryż à la Pol-Tex i smażoną fasolę w stylu meksykańskim. Nie będę ukrywać, że tę ostatnią kupuję gotową - w puszce.
I have also decided to join the project and write about My Texas Alphabet twice a week.
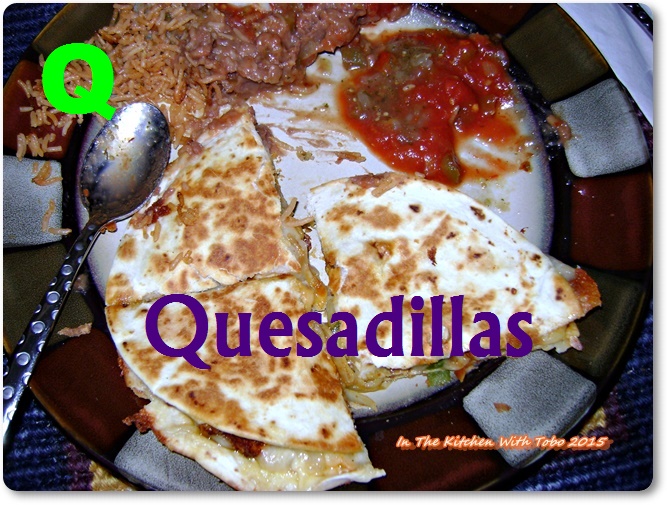
Quesadillas are one of the dishes on the Tex-Mex menu which I learned to make from scratch. We enjoy having them from time to time. You can read here what I wrote about it some time ago.
Quesadillas to jedno z dań kuchni Tex-Mex bardzo popularnej w Teksasie. Nauczyłam się je przyrządzać i muszę dodać, że moje quesadillas smakują nam lepiej niż te serwowane w pobliskim miejscu z jedzeniem meksykańskim. Przepis jest dosyć łatwy więc przygotowanie quesadillas nie sprawia mi dużego kłopotu. Podaję do nich ryż à la Pol-Tex i smażoną fasolę w stylu meksykańskim. Nie będę ukrywać, że tę ostatnią kupuję gotową - w puszce.
Co potrzeba do zrobienia quesadillas (porcja na dwie osoby):
- pierś z kurczaka (pojedyncza) - pokrojona na małe kawałeczki,
- przyprawa do taco,
- mała cebula - pokrojona w kostkę,
- pół zielonej papryki pokrojonej na paseczki,
- żółty ser (ostry) - tarty,
- kilka kropel ostrego sosu meksykańskiego,
- 4 pszenne tortille,
- olej do smażenia mięsa, cebuli i papryki,
- masło do smażenia quesadillas (2 łyżki).
Co z tym zrobić:
Orginał przepisu, z którego korzystam tutaj.Friday, August 28, 2015
Taste of (Polish) Summer
Summer in Poland means, besides warmer weather, fresh fruit based dishes. At least to me.
Strawberries served with cream and sugar, blueberry pierogi, plum knedle, blueberry soup and cherry soup made by my mum. All so very tasty and refreshing at the same time!
I enjoy having and making various kinds of food: Southern, Tex-Mex, Asian, Italian or, generally speaking, European. But, sometimes I do crave the meals we had at home in Poland. The familiar/favorite tastes of the cuisine not available here. Since I am not good at making any type of pierogi (I have tried a few times but the results were rather miserable), I do not even attempt to cook anything like that these days. That is why, missing the summer Polish dishes, I finally cooked cherry soup. Easy to make and so enjoyable! All you need is the fruit, water, sugar and some cornstarch ( I used Polish potato flour instead). Some time ago I bought a bag of frozen, pitted cherries - I thought I would make a pie. Later I forgot about them. When the crave for the fruit meals came, I had the key ingredient in the freezer, ready to be cooked.

I had not eaten this kind of soup for about four years, so I was quite happy when I made it. It was sooooooooo good! Next time I will make blueberry soup - soon!
Strawberries served with cream and sugar, blueberry pierogi, plum knedle, blueberry soup and cherry soup made by my mum. All so very tasty and refreshing at the same time!
I enjoy having and making various kinds of food: Southern, Tex-Mex, Asian, Italian or, generally speaking, European. But, sometimes I do crave the meals we had at home in Poland. The familiar/favorite tastes of the cuisine not available here. Since I am not good at making any type of pierogi (I have tried a few times but the results were rather miserable), I do not even attempt to cook anything like that these days. That is why, missing the summer Polish dishes, I finally cooked cherry soup. Easy to make and so enjoyable! All you need is the fruit, water, sugar and some cornstarch ( I used Polish potato flour instead). Some time ago I bought a bag of frozen, pitted cherries - I thought I would make a pie. Later I forgot about them. When the crave for the fruit meals came, I had the key ingredient in the freezer, ready to be cooked.

What I used (for two servings):
- 1 bag (12 oz) frozen (pitted) sweet, dark cherries - I used about 99% of the bag content
- water,
- 3 TBS sugar,
- about 1 TBS potato flour (cornstarch),
- 2 qt pan.
- And: 1/2 cup elbow pasta.
What to do with it:
- Cover frozen cherries with water and cook (at 4) to boil, add sugar (the soup should be refreshing, not too sweet).
- Mix potato flour (or cornstarch) with a bit of cold water, add this mixture to the soup, to thicken it (do not make it too thick!), stir, cook for about two minutes. If it happens that the soup gets too thick, add some more cold water.
- Remove from heat and chill.
- Cook the pasta according to the instructions provided by its manufacturer.
- Serve the chilled soup with pasta.
I had not eaten this kind of soup for about four years, so I was quite happy when I made it. It was sooooooooo good! Next time I will make blueberry soup - soon!
Monday, July 6, 2015
Banana Bread from Aldi
Of course, banana bread made from the scratch is the best but the one we
have found at Aldi's is quite good too. Especially considering that the
bread comes 'from the box'.

The bread mix contains real bananas. You only need to stir it/combine with some water, oil and eggs. No mixer needed, just a spoon. I also add some raisins and chopped pecans to the bread mixture.
When baked, it tastes really nice so it can be served as a party treat (with no risk of being ashamed of its quality). If you prefer muffins, you can bake them using the mix and a muffin tin.
The bread is very easy to make and it is inexpensive too. We like to have it from time to time.


The bread mix contains real bananas. You only need to stir it/combine with some water, oil and eggs. No mixer needed, just a spoon. I also add some raisins and chopped pecans to the bread mixture.
When baked, it tastes really nice so it can be served as a party treat (with no risk of being ashamed of its quality). If you prefer muffins, you can bake them using the mix and a muffin tin.
The bread is very easy to make and it is inexpensive too. We like to have it from time to time.

Friday, June 19, 2015
Easy Salad - A Gift Option For Father's Day

What you need (for 2 servings):
- 1 slice of red bell pepper
- 1 slice of yellow bell pepper
- 1 slice of orange bell pepper ( if you have one kind of bell pepper only, you can use more slices of that)
- 2 baby carrots
- a slice of onion (or 1 green onion)
- 1/2 bag salad (lettuce) mix
- some grated cheese
- about 8 salad croutons
- your father's favorite salad dressing
- Prepare two bowls - one for you and one for your dad.
- Put the lettuce mix into a colander, wash it with cold water and drain it. Divide the lettuce mix into two parts. Put each part into a bowl.
- Cut bell peppers, carrots and onion/green onion into small pieces. Divide each of the cut ingredients into two and put them in the bowls.
- Sprinkle some grated cheese on the salad mix you made.
- Place the croutons at the top.
- Serve with your father's favorite salad dressing.

Friday, May 1, 2015
Baked Mac & Cheese
 |
| before baking... |
I have tried quite a few mac & cheese recipes, including making it on the stove, but this one seems to be the best of all.
 |
| After baking.... |
Wednesday, April 29, 2015
Blogging: 3 in 1
I have decided it is time for me to merge the three blogs which I run, and make them one and the same Internet space called FavTreats.
My other blogs are: In The Kitchen With Tobo and Our Cats & Friends. I started the previous one when I moved to the US. I shared my kitchen - cooking and baking - experiences there, meaning learning, trying new recipes + something more. At first I posted pictures only, later I was adding some texts also.
Somebody has said that kitchen is the heart of home. I do agree that kitchen is not only about cooking. It is also about sharing and being together - with your family and friends. And about learning too, which means not only cooking again. Anyway, I do love learning the Southern cooking and trying new recipes.
But it is only a part of it all which really matters.

My other blogs are: In The Kitchen With Tobo and Our Cats & Friends. I started the previous one when I moved to the US. I shared my kitchen - cooking and baking - experiences there, meaning learning, trying new recipes + something more. At first I posted pictures only, later I was adding some texts also.
In The Kitchen With Tobo
From the blog description: This blog has never meant to be just another cookery Internet space or a cook blog. There are so many such pages with interesting, useful recipes you can try in your kitchen. Another one is not really needed then. That is why if you are searching any particular recipes, probably you won't find them here.Somebody has said that kitchen is the heart of home. I do agree that kitchen is not only about cooking. It is also about sharing and being together - with your family and friends. And about learning too, which means not only cooking again. Anyway, I do love learning the Southern cooking and trying new recipes.
But it is only a part of it all which really matters.
Our Cats & Friends
The other blog had its beginning much earlier, in 2008. It is dedicated to all the pets and animals we meet on our ways who have made our days brighter and more joyful. Just to save them from being forgotten. Not many words but much love. |
| Our cats |
Subscribe to:
Posts
(
Atom
)